Vaidik Yoga

Download more awesome themes for your blogger platform #templatetrackers Follow us @ Google+ and get weekly updates of new templates we release regularly

1.Bridge yoga pose - Sethu bandha Sarvangasana


Level: Beginner

Benefits: Strengthens the back, buttocks, and hamstrings. Opens chest and hips and stretches the neck spine, chest and hips. Helps relieve back pain, improves digestion and can help relieve headaches. Improves blood circulation and calms the brain and nervous system. Great beginning pose to help create spinal flexibility for more challenging back bend poses.

How to do bridge pose


• supported for normal back pain

•  Lie on your back on the floor with your knees bent directly over your heels

• Place arms at sides, palms down. Exhale and press your feet into the floor as you lift your hips high

• Clasp hands under lower back and press arms down, lifting hips until they are parallel to the. floor, bringing your chest towards your chin.

• Hold pose for 30 seconds to 1 minute, breathing steadily and easily Exit


 2.Sphinx pose - Salamba Bhujangasana

Level: Beginner


Benefit: The Sphinx Pose is a modified version of the Cobra Pose (Bhujangasana). Like the Cobra pose, it lengthens the abdominal muscles, strengthens the spine, and firms the buttocks while stretching and opening the chest, lungs, and shoulders, but it distributes weight on the forearms rather than the wrist, and creates a slightly less curve to the spine.


How to do sphinx pose


  • • Begin by lying face down on the floor with your legs extended behind you, hip width apart.

  • inhale and bring your arms forward, pressing your forearms into the floor.

  • This will lift your shoulders off the ground. Press your shoulders backward and your pubic bone down into the floor, creating a small bow in your spine.
  •  Hold for 10-20 seconds and then exhale as you slowly lower your torso, head and chest back to the floor.


3.Wheel pose -Urdhva Dhanurasana

Level: Intermediated


Benefits: Good relief for back pain, helps stretch the lungs and chest and strengthens the legs, abdomen, buttocks, arms and wrists. Helps improve blood circulation to the entire body.


How to do wheel pose


• Start lying flat on your back on a yoga mat with your arms at your sides. Bend then knees and place arms up overhead.

• Bend your elbows and place palms on floor on either side of your head, extending elbows upward.


• Inhale and lift your shoulders off the yoga mat by pressing palms against the floor and lifting your hips toward the roof. As you lift your body off the floor, take care to not put any pressure on the head or neck. Once you are raised, you can allow your head to drop back loosely.


• Hold position for 10-50 seconds, breathing normally. 


• Step 5: Exit pose by slowly lowering body back down to mat.


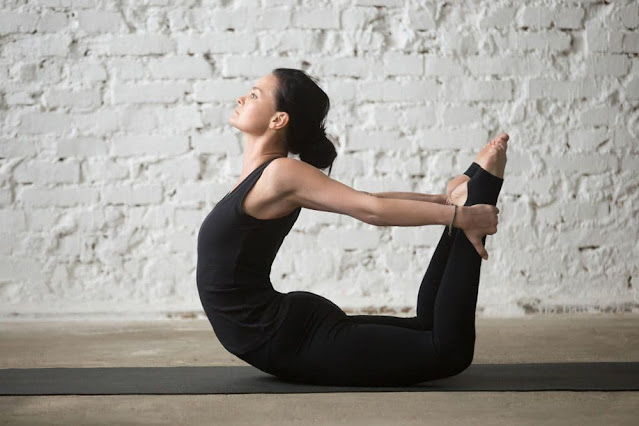
4.Bow Pose - Dhanurasana


Level: Intermediate


Benefits: Stimulates the function of kidney and liver and massages the abdominal organs, which can help relieve constipation. Strengthens and gives the flexibility for the back muscles. Strengthens the ankles, thighs, groins and chest and relieves back pain. Helps to shape the body and improves the posture. Opens up the chest, neck and shoulders and tones the leg and arm muscles. Improves core strength.


How to do bow pose


• Lie on your belly on the ground. Bending your legs backwards and grasp the ankles with the hands.


• Pull your ankles forward with your hands, drawing your shoulders back towards your feet until your torso lifts off the ground forming a bow shape with your body. Only your stomach and pelvic area should remain on the ground, supporting your entire body weight. 

•  Hold this position for 20 -60 seconds before releasing back down to mat.


5.Camel Pose-Ustrasana


Level: Intermediate

How to do Camel Pose


Benefit: Helps improve flexibility in the spine, which helps avoid lower back pain problems. This yoga asana opens and stretches the hips and chest, which also helps increase oxygen intake and strengthens the arms and thigh                  


•Kneel on your yoga mat and place hands on hips, making sure that shoulders and knees are in alignment and the soles of your feet are facing the ceiling.


• Inhale slowly and imagine a cord pulling you for ward from the navel. As your back slowly arches, reach behind you and grab your heels. Your neck should be in a neutral position so it does not strain.


• Hold position for 30-60 seconds breathing normally, before returning to starting pose. Advanced yogis can deepen into the Little Thunderbolt Pose.


It can be said that in today's developed society, YOGA is becoming more and more familiar and close to many people, especially our office people - who have little time to move due to the specific work. Before going any deeper into this sport, we should have an overview of YOGA.

1. What is YOGA?

Certainly, we hear from the YOGA a lot, everywhere, the media, the advertising, the media ... but the nature of YOGA is not certain we all know. According to history books, YOGA is a method of training the body (combining spirit and body), originating in India, and this method requires quite strict, methodical and concentration training regime. high. Other information you can search yourself, because it is available on the Internet today.

2. Basic YOGA poses and movements:

Wait, what do you guys need to have before you get started? That is the YOGA practice mat, everyone can refer to some of the best- selling yoga mats.

Posture 01: Mountain - Mountain posture:

·         Stand up straight with 2 feet, relax both shoulders, the weight of the body will be spread evenly across the feet, the hands are placed on both sides.

·         Take a deep breath, slowly raise your hands, palms facing each other, and create your body in a straight line from under your feet to your fingertips.

Mountain - Mountain posture:
Mountain - Mountain posture


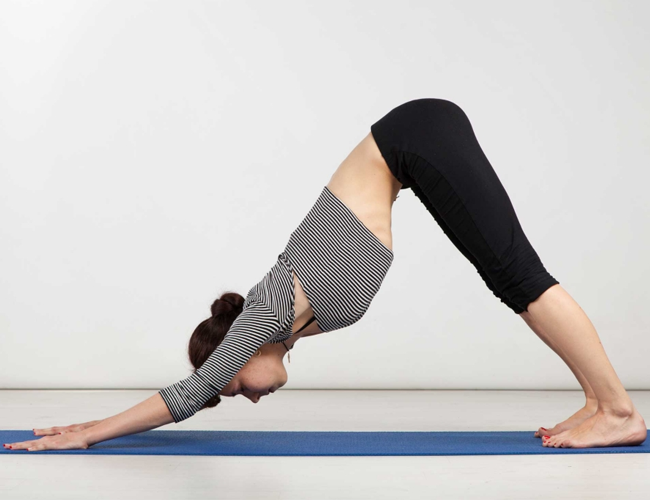
Position 02: Downward Dog - Dog bow:

·         True to its name, the dog bowed. Imagine how the dog bowed, I did it, with both hands and feet touching the ground (or practice mat), hands lower than shoulders, knees lower than hips (of course!)

·         Slowly press your toes down, then gradually push your hips up, turning your body into an inverted V-shape, gradually widening your shoulders. At the same time 2 legs spread hip-width apart, then knees gradually dropped.

·         Hold that position for 3 breaths.


Downward Dog - Dog bow


Posture 03: Warrior - Warrior:

·         Stand in a two-foot style that is approximately 1 meter apart, right foot facing forward, and left foot 90 degrees toward right foot.

·         Put your hands on your hips, relax your shoulders, then gradually raise your arms to shoulder height, palms face down.

·         Gradually bend the right knee to a 90 degree angle, so that the knee is aligned with the ankle, looking towards the right hand, maintain that position for 1 minute.

·         Switch to the other side and repeat.


Warrior


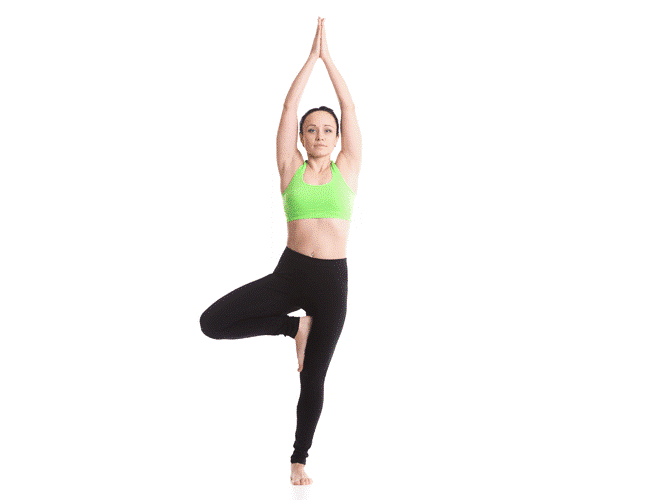
Posture 04: Tree - Tree shape:

·         Stand up straight, hands straight hips.

·         Pull the right leg up to touch the left thigh, the body weight will be on the left leg, the hips will be straight forward.

·         While keeping your balance, gradually raise your hands above your head, like a prayer posture. Palms facing each other, can touch palms together or keep distance, so that arms are straight.

·         Hold for 30 seconds, then switch sides and repeat.


Tree Shape


Posture 05: Bridge - Bridge:

·         Relax, stretch your chest, thighs, and spine.

·         Lie on the floor, practice mat, place hands on both sides, palms face down on the floor. Then, exhale lightly, pressing your feet to the floor, gradually lifting your hips up.

·         Keep your arms touching the floor, trying to lift your hips up until thighs are parallel to the floor, chest up toward chin. Hold this position for 1 minute.

·         To make this pose easier, you should place a pillow or small cloth on the tailbone.


Bridge Yoga


Posture 06: Triangle - Triangle:

·         It is easy to imagine, stretching both arms on both sides, then gradually leaning to the left.

·         Stand so that your feet are about 80 to 90 centimeters apart, your right foot forms a 90 degree angle, while your left leg tries to be 45 degrees.

·         Now for this difficult part, pull down with your left hand until it touches the floor, or touch your left leg, remember to stretch your toes.

·         Look up towards the ceiling, in the direction of your right hand, and stay in that position for 5 breaths.

·         Stand up straight, switch sides and continue practicing.


Triangle


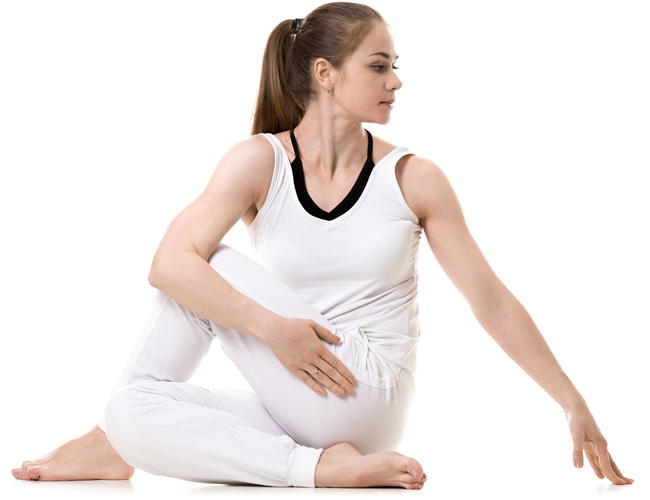
Position 07: Seated Twist - Swivel sit:

·         Straighten shoulders, hips, and back.

·         Get started, sit on the floor or the carpet, legs stretched out.

·         Cross your right leg across your left thigh, and of course your left right knee is bent, pointing up towards the ceiling.

·         Try to twist your body to the right, as much as possible, move your abs, and don't forget to keep your butt in place. Hold this position for about 1 minute.

·         Switch sides and repeat.

·         Note that to practice this movement easily, you should place your left leg straight on the floor, both hands on your right thigh.


Seated Twist


Position 08: Cobra - Cobra:

·         Because our bodies cannot be as tough as snakes, we can only do this: lying on their stomach, hands down on the floor, practice mat, leg straightening, instep resting on the floor.

·         This part is difficult: stretching the buttocks and pushing the hips down (feels like twisting glutes).

·         Shoulders step back down, away from ears.

·         Push your hand slowly from the thumb to the floor, gradually lifting your chest up (like a solid head-up position).

·         Then gradually relax your shoulders, repeat the movement.


Cobra


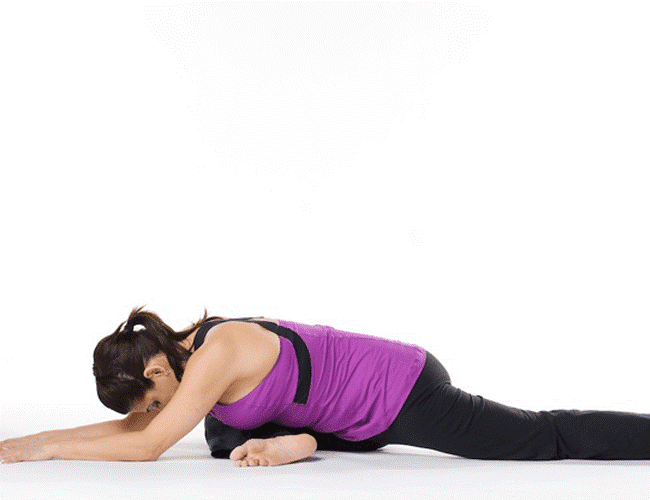
Posture 09: Pigeon - Pigeon:

This exercise mainly helps us to have toned, strong and beautiful butt muscles

·         Start with the same posture as doing push-ups, with palms facing up, directly below the shoulders.

·         Lower your forearms, slowly starting to pull your right leg up so that your big toe and instep touch the floor.

·         Chest up, eyes down.

·         If your body is supple type, try to push your chest down on the floor while stretching your arms out in front of you.

·         Bend the pillow towards the floor, then release it gradually. Repeat 5 times, then switch sides and continue.

pigeon


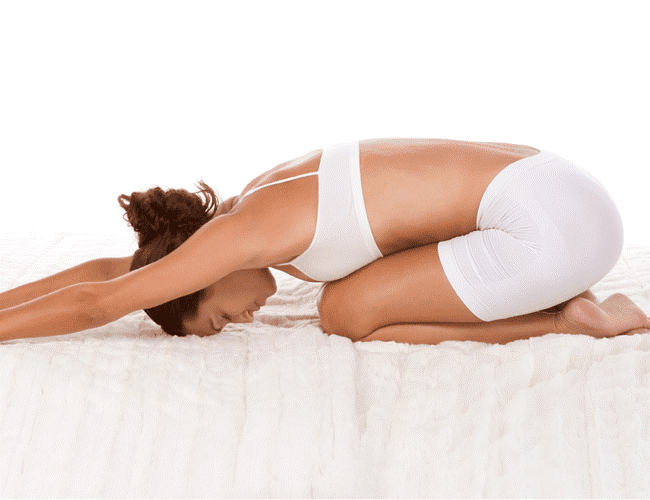
Position 10: Child - Child:

·         Try to sit comfortably on the soles of your feet.

·         Gradually pull the torso forward, forehead touching the floor.

·         Gradually lower the chest closer to the knees (so that it is still comfortable), gradually stretch your arms forward.

·         Hold that position and breathe evenly


Child Pose


Above are some of the basic postures of YOGA - exercise method to improve health, combining body and spirit, very good for those who want to improve fitness, physique but have little conditions, movement time. Good luck!


How often do we figure a person doing the headstand against some picturesque backdrop and say ‘yoga is not for me’? You might want to revisit your thought once you go through these 9 unique beginners’ yoga tips. This is an easy way to initiate your yoga practice and reap the benefits yoga has to offer. Read them and find yourself doing yoga against a picturesque backdrop instead.


Yoga Tips for Beginners 

Yoga Tips for Beginners


Yoga for Beginners

  1.  Yoga A New Dimension to Life
  2.  Take the Experts Help to Learn Yoga
  3.  Dress Comfortably!
  4.  Be a Regular Yogi
  5.  Stay Light!
  6.  Warm-up before Hitting the Yoga Mat
  7.  Challenge Your Limits – One Step at a Time
  8.  Every Yoga Asana Is Unique, Just Like You
  9.  Relax to Recharge! - Yoga Tips


1. Yoga for Beginners

As a beginner, often we equate yoga with some tough, limb-twisting poses. And aren't you sometimes concerned that: "I can't even touch my toes, how can I do yoga?" Yoga is not about touching your toes, or stretching 98 degrees to your northeast. It’s a simple process of uniting with yourself - using your breath, body and mind. And it’s easy and effortless.

So, never mind if you're not Ms. Flexible or Mr. Stretchable, or are venturing into yoga at the age of 40, or you have secret love handles that are stressing you out - just remove all those myths before beginning your yoga practice! The only one watching you is yourself - so just relax. This journey will bring much joy and relaxation to you!

2.Take the Experts Help to Learn Yoga

If you have a medical condition, inform your Sri Sri Yoga instructor prior to the commencement of your yoga training. It will help the teacher customize your yoga asana practice and avoid any complications or injuries.

3 Dress Comfortably!

Wear comfortable clothing while going for the yoga class or when practicing yoga at home. Also, avoid wearing belts or excessive jewelry as it could get in the way of your yoga practice.

4. Be a Regular Yogi

Although it’s best to practice yoga asanas early in the morning, any time of the day is fine till you are regular with your practice. If mornings don’t suit your schedule, don’t let it be an excuse to give up practicing yoga completely!

5. Stay Light!

It is advised to practice on an empty stomach or at least 2-3 hours after your last meal. Also, it’s advised to have at least three to four liters of water during the day as it will help you to flush the toxins that are released during your yoga practice, out of the body.

6. Warm-up before Hitting the Yoga Mat

Sukshma Vyayam or gentle warm-up exercises help loosen up the body and prepare it for the yoga asanas coming ahead. Here are a few warm up exercises:

> Massaging the head, brows, nose and cheeks: Whenever we make a mistake, we instinctively place a hand on the head. This is a sign that blood circulation in the brain is less and a massage is needed!

> Rotate your neck, both clockwise and anticlockwise to relieve any stiffness.

> Pump your shoulders and shake those hands to shrug off the lethargy.

7. Challenge Your Limits – One Step at a Time

The ancient yogic text, Patanjali Yoga Sutra, defines yoga asana as Sthira Sukham Asanam. Do only as much as you comfortably can and then just stretch a bit more (to improve body flexibility). Remember to use the breath as a reference point - when it is light and long, then the muscles begin to relax; but when the breath is jagged or uneven, it means you have over-exerted.

Going slightly beyond your comfort zone will keep the yoga practice interesting and will add a spark of challenge as you progress and adopt new yoga asanas.

8. Every Yoga Asana Is Unique, Just Like You

Wherever you stand in your yoga practice, be happy with it and don’t compare yourself to other students in the yoga class. Remember that each body type is unique and different people are at different levels of expertise. Some might easily perform a particular yoga asana, while others may need a little more time and practice to get there. Therefore, don't feel pressurized and over-exert yourself. Your flexibility and efficiency in doing yoga postures will improve with regular practice.

Do not be alarmed if you experience some soreness in the muscles during the initial days of the practice. But if the pain persists, inform your instructor immediately. The crux here is to be regular with your yoga practice and have patience. Just like any other discipline, it will take some time for the body to get used to the yoga asanas.

9. Relax to Recharge! - Yoga Tips

As you complete your yoga asana practice, don't be in a great hurry to get up and start moving about with the tasks lined up for the day. It is a good idea to lie down in Yoga Nidra for a few minutes, as it helps cool down the body and consolidate the energy produced through yoga asana practice. Yoga Nidra is also beneficial in completely relaxing the mind and body after the yoga workout.

Conclusion

You will be able to experience the subtler and deeper benefits of yoga in due time only if you stay regular with your practice. Yoga encompasses yoga asanas, timeless ancient philosophy, pranayamas (breathing techniques) and meditations, which take you beyond the body level, offering a deeper spiritual experience.

Your body is like the wick of a candle and the mind is like the glow all around it. It is the "Prana" or life force in us that nourishes the mind and keeps the body alive. "Pranayama" means working in the dimension of "prana".

The Prana creates an aura around the body. Every problem first generates in the subtle and then surfaces on the physical level. Sickness shows up in your Prana (Pranic Body) much before you get sick physically. Pranayama clears the whole energy around you, expands your aura and heightens the spirit. It brings clarity to the mind and good health to the body.

So, give yourself some of your valuable time and be patient for the results that will make you more flexible, healthy, calm, efficient and zealous. Happy practicing yogis!