1.Bridge yoga pose - Sethu bandha Sarvangasana
Level: Beginner
Benefits: Strengthens the back, buttocks, and hamstrings. Opens chest and hips and stretches the neck spine, chest and hips. Helps relieve back pain, improves digestion and can help relieve headaches. Improves blood circulation and calms the brain and nervous system. Great beginning pose to help create spinal flexibility for more challenging back bend poses.
How to do bridge pose
• supported for normal back pain
• Lie on your back on the floor with your knees bent directly over your heels
• Place arms at sides, palms down. Exhale and press your feet into the floor as you lift your hips high
• Clasp hands under lower back and press arms down, lifting hips until they are parallel to the. floor, bringing your chest towards your chin.
• Hold pose for 30 seconds to 1 minute, breathing steadily and easily Exit
2.Sphinx pose - Salamba Bhujangasana
Level: Beginner
Benefit: The Sphinx Pose is a modified version of the Cobra Pose (Bhujangasana). Like the Cobra pose, it lengthens the abdominal muscles, strengthens the spine, and firms the buttocks while stretching and opening the chest, lungs, and shoulders, but it distributes weight on the forearms rather than the wrist, and creates a slightly less curve to the spine.
How to do sphinx pose
- • Begin by lying face down on the floor with your legs extended behind you, hip width apart.
- inhale and bring your arms forward, pressing your forearms into the floor.
- This will lift your shoulders off the ground. Press your shoulders backward and your pubic bone down into the floor, creating a small bow in your spine.
- Hold for 10-20 seconds and then exhale as you slowly lower your torso, head and chest back to the floor.
3.Wheel pose -Urdhva Dhanurasana
Level: Intermediated
Benefits: Good relief for back pain, helps stretch the lungs and chest and strengthens the legs, abdomen, buttocks, arms and wrists. Helps improve blood circulation to the entire body.
How to do wheel pose
• Start lying flat on your back on a yoga mat with your arms at your sides. Bend then knees and place arms up overhead.
• Bend your elbows and place palms on floor on either side of your head, extending elbows upward.
• Inhale and lift your shoulders off the yoga mat by pressing palms against the floor and lifting your hips toward the roof. As you lift your body off the floor, take care to not put any pressure on the head or neck. Once you are raised, you can allow your head to drop back loosely.
• Hold position for 10-50 seconds, breathing normally.
• Step 5: Exit pose by slowly lowering body back down to mat.
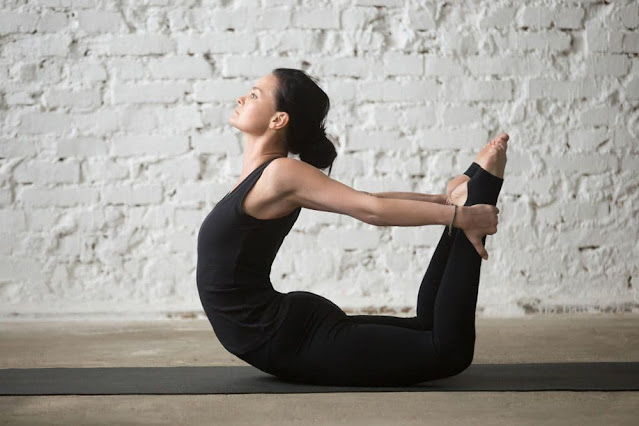
4.Bow Pose - Dhanurasana
Level: Intermediate
Benefits: Stimulates the function of kidney and liver and massages the abdominal organs, which can help relieve constipation. Strengthens and gives the flexibility for the back muscles. Strengthens the ankles, thighs, groins and chest and relieves back pain. Helps to shape the body and improves the posture. Opens up the chest, neck and shoulders and tones the leg and arm muscles. Improves core strength.
How to do bow pose
• Lie on your belly on the ground. Bending your legs backwards and grasp the ankles with the hands.
• Pull your ankles forward with your hands, drawing your shoulders back towards your feet until your torso lifts off the ground forming a bow shape with your body. Only your stomach and pelvic area should remain on the ground, supporting your entire body weight.
• Hold this position for 20 -60 seconds before releasing back down to mat.
5.Camel Pose-Ustrasana
Level: Intermediate
How to do Camel Pose
Benefit: Helps improve flexibility in the spine, which helps avoid lower back pain problems. This yoga asana opens and stretches the hips and chest, which also helps increase oxygen intake and strengthens the arms and thigh
•Kneel on your yoga mat and place hands on hips, making sure that shoulders and knees are in alignment and the soles of your feet are facing the ceiling.
• Inhale slowly and imagine a cord pulling you for ward from the navel. As your back slowly arches, reach behind you and grab your heels. Your neck should be in a neutral position so it does not strain.
• Hold position for 30-60 seconds breathing normally, before returning to starting pose. Advanced yogis can deepen into the Little Thunderbolt Pose.


0 Reviews:
Post a Comment